


For whom the bell swings.
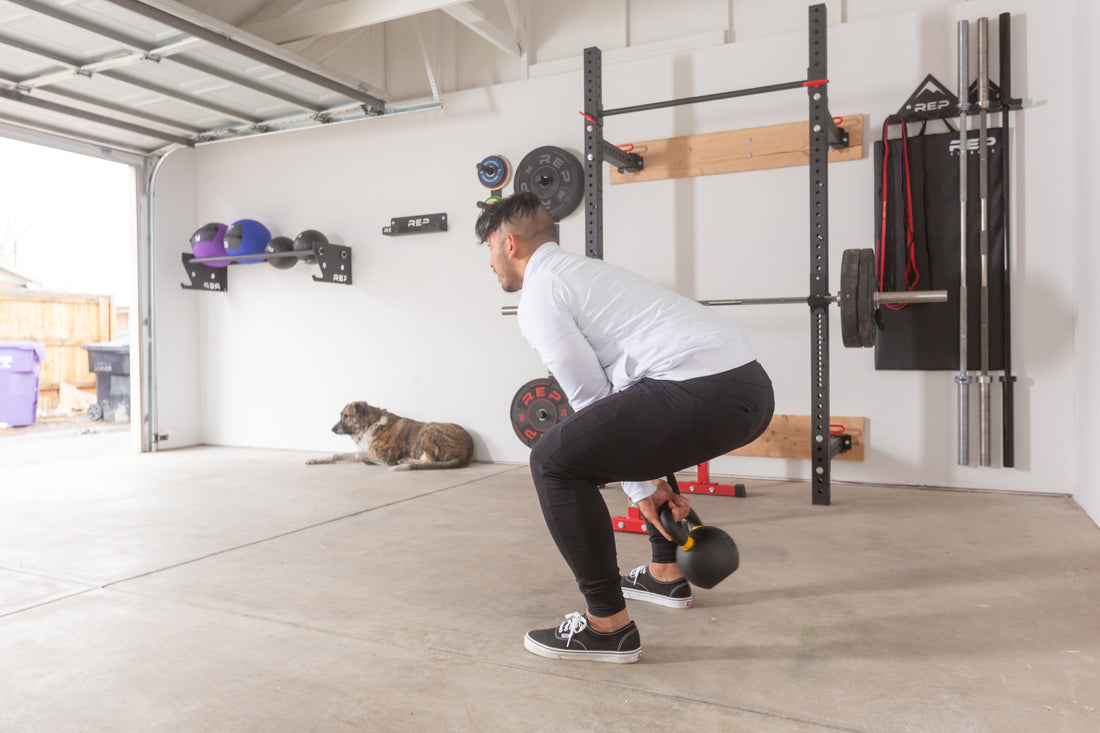
Kettlebells might be one of the most versatile and underrated training tools in a gym's arsenal. Their design makes them optimal for conditioning, compound movements, raw strength, and so much more. Not to mention, they're uniquely suited to train the body's stabilizing muscles, like the core, glutes, hips, shoulders, knees, and ankles.
While we all love a classic kettlebell swing, have you found yourself itching for new creative movements to try with your beloved bell? Look no further. I sourced REP's team of certified kettlebell trainers (myself included) to come up with nine advanced kettlebell exercises that will re-energize your workouts and target muscles in ways you never imaged.
Ready? Let's get it.
Meet the Experts
- Terry Jackson, a PPSC Kettlebell Certified pro, NSCA-CPT, USAW-L2, and CFL1, is a household name at REP HQ (particularly as the Director of Gains and Chief Repetitions Officer). He not only programs weekly workouts for the team, but coaches REP athletes on Olympic Weightlifting techniques (checkout our social manager, Nikki Frick, who took first place in her division at her last meet thanks to Terry's guidance!)
- Monica Henrichs, BS Kinesiology, CSCS, PPSC Kettlebell Certified, Precision Nutrition Level 1, Pregnancy and Postpartum Corrective Exercise Specialist (PCES)—yeah, she's got all the credentials. Monica's kettlebell training style aims to challenge endurance, coordination, and improve overall sport performance and reactivity.
- Ashley Boyer (thaaaat's me!), ACE-CPT and MS candidate in Sports Performance and Conditioning. I've been a personal trainer and strength coach for almost a decade. I like to bring out kettlebells for mobility training (slow and steady) and movement complexes (think anything that stacks multiple exercises into a single flow).
9 Advanced Kettlebell Exercises Everyone Should Try
1. Windmill
Muscles worked: Obliques, core, glutes, hamstrings, shoulders.
The kettlebell windmill is a full-body movement that primarily targets your obliques and core, says Jackson, while also engaging the glutes, hamstrings, and shoulders. It’s especially effective at activating the smaller stabilizing muscles around the shoulder — including the rotator cuff, rhomboids, and upper back — making it as much about control and stability as it is about strength.
Why it's great
"The kettlebell windmill is a powerful blend of strength, control, and mobility — and in my opinion, it deserves a lot more attention than it gets. While the Turkish get-up often takes the spotlight in kettlebell training, I’d argue the windmill is just as valuable, if not more so, when it comes to building functional strength and real-world movement capability," Jackson says.
This movement targets areas that are often undertrained — your hips, hamstrings, and obliques — while also strengthening the glutes and core. Holding the bell overhead adds another layer, demanding shoulder stability and lat engagement, all while challenging your balance and body awareness.
One of the most underrated benefits? The rotation through your upper back and torso. The thoracic spine plays a huge role in posture and everyday movement, and the windmill trains it to move well under load — something the get-up doesn't hit quite as directly.
And unlike the get-up, which is long and often hard to break down for beginners, the windmill offers a more accessible way to develop similar overhead stability and body control, without needing to piece together a dozen steps.
How to do a kettlebell windmill
- Stand with your feet comfortably under your hips and a kettlebell nearby. Clean the bell up to your should and extend your arm so it is racked overhead.
- Extend your opposite arm so it's pointing toward the floor. Pro tip: If you've ever done a triangle pose in yoga, there's a lot of overlap to this technique.
- Keeping your eyes on the kettlebell, push your hips back to make space to lower your bottom hand toward the ground. Keep knees soft, but minimize the bend (this isn't a squat, it's a hinge).
- Reach down until you're able to press your palm flat onto the floor. Keep in mind, this level of mobility and flexibility may take time to work up to (tight hammies, anyone?). If you are unable to go palm-to-floor, lower down as far as you can with good form. Then retrace the movement back to standing.
- Note: Your job is to keep that top arm extended and the kettlebell overhead throughout the entire movement. Reset if your elbow starts to bend or the kettlebell begins to drop.
2. Bottoms-Up Kettlebell Press
Muscles worked: shoulders, grip, core, forearms, triceps
The bottoms-up kettlebell press targets the shoulders, core, and grip as its primary movers, while also engaging the triceps, rotator cuff, and forearms. Because the kettlebell is held in an unstable, inverted position, the movement demands increased activation from stabilizing muscles, particularly in the shoulders and core, to maintain control throughout the press.
Why it's great
The bottoms-up press is a unique and challenging kettlebell movement that you won’t find with any other piece of equipment. It’s an excellent way to build grip strength, shoulder stability, and total-body control — all in one lift.
Typically performed with one arm at a time in a strict, military-style press, this variation demands intense focus and balance. The inverted position of the kettlebell creates an unstable load, forcing your grip, forearm, and stabilizing muscles to work overtime.
It trains more than just strength — the bottoms-up press helps develop control, coordination, and joint integrity, especially in the shoulder. It’s a smart addition for anyone looking to improve overhead strength, reinforce shoulder health, or add a fresh challenge to their training routine.
How to do the bottoms-up press:
- Set up in a standing position with feet stacked under hips. Clean your kettlebell up into the bottoms-up position (no worries if you need to use your opposite hand to help get the bell into position).
- Squeezing the handle so the kettlebell stays locked in place, begin your press. Press the kettlebell overhead, resisting any lateral flexion (aka a sideways lean) and keeping your posture tall.
-
Lower your elbow down until your hand reaches about shoulder height. Rinse and repeat for the desired number of reps.
- Pro tip: If you’re new to the movement or going heavy, be sure to practice in a safe space where you can safely drop the bell if needed.
3. Waiter's Clean
Muscles worked: shoulders, upper back, core, and grip
It also engages stabilizing muscles throughout the forearms, rotator cuff, and torso, with additional activation in the glutes and hamstrings during the clean portion of the movement.
Why it's great
The waiter's clean isn’t just a flashy kettlebell variation, says Jackson, it’s a smart, skill-focused movement that challenges your ability to control the bell in an unsteady position. Unlike a traditional clean, where the kettlebell settles comfortably in the rack against your forearm, this variation finishes with the bell in a more upright, tray-like position, which demands much more from your wrist, shoulder, and grip stability.
Because the kettlebell is less stable in this position, your smaller stabilizing muscles — especially in the shoulder joint, rotator cuff, and forearm — have to work harder to maintain control. That challenge not only builds strength, but also sharpens your motor control and movement accuracy. These improvements carry over directly into other lifts, such as overhead presses, Turkish get-ups, and waiter-style carries.
Incorporating the waiter's clean into your training can also help you develop better postural awareness, shoulder alignment, and joint integrity. Whether you're an athlete, a lifter, or just someone focused on moving well and staying strong, this drill is a powerful tool for building resilient upper-body mechanics and injury prevention.
How to do a waiter's kettlebell clean
- Stand with feet hip-width apart with a kettlebell between your feet. Hinge at the hips (like a deadlift) and grip the kettlebell with one hand. Keep your back flat, core braced, and lats engaged.
- Explosively extend your hips and knees (as if jumping) while pulling the kettlebell straight up your midline. Keep your elbow close to your body — imagine zipping up a jacket.
- Time to flip and catch. As the kettlebell reaches chest height, quickly rotate your wrist and forearm under the bell. Catch the bell in your hand like a waiter holding a tray— think "be our guest".
- Do not let the kettlebell crash or flop backward — the motion should be crisp and controlled.
- With a slight push, jump the bell off your hands and grab the handle. Reset from the ground or, if you're ready for level 2, find a flow by resetting with a swing at the bottom half of the movement. Get some momentum going and test your skills.
- Pro tip: If you’re new to the movement or going heavy, be sure to practice in a safe space where you can safely drop the bell if needed.
4. Hike Swing or Dead-Stop Swing
Muscles worked: glutes, hamstrings, lower back, and core.
Why it's great
"I like this move because it makes me feel powerful. It can be done with a heavier bell because reps are not as high and it loads the lower body in a way that is very athletic. The hike swing is a great “in-between” movement for a heavy deadlift and a standard kettlebell swing," says Henrichs.
How to do a hike swing
-
Set up as you would for a traditional kettlebell swing, with the bell about one-foot in front of you and in solid squat position. Think about making a triangle with your feet and the kettlebell.
- Take a breah and brace, then hike the kettlebell back between your legs (just like a football to a quarterback).
- Drive through your glutes and snap your hips forward to send the kettlebell out in front of your chest/eyes. Remember the arms should not be doing much work—the power comes from your hips.
- Allow the kettle bell to retrace its path back between your legs. This time when the bell comes forward, set it on the floor back at the starting position. Your triangle should be reset, just like at the start of the movement. Repeat for the desired number of reps.
5. Two-Handed Kettlebell Cleans
Muscles worked: quadriceps, hamstrings, glutes, core, shoulders, biceps
Why it's great
Henrichs loves the versatility of this movement. "It can be combined with squats, lunges, swings, step ups. The possibilities are endless!" she says.
It can also be done in a single hand and palm clean variations. Combine this movement with one or more exercises to create efficient, time-conscious workouts.
How to do a two-handed kettlebell clean
- Start with your kettlebells between your feet and come down into a squat, gripping the top handles.
- Drive up through your legs and flip the bells into a shoulder-racked position.
- Reverse the movement back to the ground and into a squat. Repeat for desired number of reps.
6. Walking Lunge with Suitcase Pass
Muscles worked: quadriceps, hamstringe, glutes, core, obliques, forearms, biceps
Why it's great
We've said it once, we'll say it again: Kettlebells rock because of how they can link multiple exercises into a single flow. According to Henrichs, this movement is a great way to add conditioning, strength, balance and coordination into your workout or training routine.
How to do walking lunges with suitcase pass
- Start in a standing position with feet under hips. With a kettlebell in your right hand, step forward with your left leg into a lunge and pass the kettlebell under your left leg to your left hand.
- Step forward so feet are side-by-side, then repeat on the opposite side.
- Repeat the motion until you've reached a certain distance or completed desired number of reps.
7. Kettlebell Bird-Dog Row
Muscles Worked: Core, glutes, posterior chain, triceps, shoulders
Why it's great
You know the feeling when you totally disassociate during exercise? That’s not going to happen here. The complexity of the movement requires total focus and full-body engagement. You’re fighting for balance and stability at the same time that you’re working to lift an offset load. It’s the perfect exercise for mind and body.
How to do kettlebell bird-dog rows
- Set up in a tabletop position on a bench with a kettlebell easily within reach on one side (for the purpose of this article, let’s say the right side).
-
Firmly plant your left hand and grab the kettlebell with your right. Now, driving through your heel, extend your left leg backwards until it is in line with your spine (not too high, not too low).
-
Keep your hips square and your spine neutral. Notice how hard it is to balance? You’ll need to brace your core, squeeze through that left glute, and brace with the left hand/right knee.
-
Once you're locked in, row the kettlebell up toward your hip (not your ribs). You might make a J shape as you row up and extend back down. Complete reps on one side, then switch and complete on the opposite.
- Pro tip: Practice taking a head-to-toe assessment during this movement. There are so many cues to keep in mind—balance, keeping hips square, neutral spine and neck, shoulders back, extended leg at the appropriate height, full ROM on the rows, AND counting reps. Breathe, focus, and get used to monitoring all of these details at once.
8. Taters
Muscles worked: glutes, hamstrings, quads, hips flexors, shoulders, core.
Why it's great
No, you can't mash 'em, boil 'em, or put 'em in a stew. But these taters can absolutely kick your butt (literally and metaphorically) during your next workout.
I'm not sure who came up with the name, or why it's so hunger-inducing, but the concept is simple: This movement combines a kettlebell swing with a squat. While it sounds easy, it requires advanced techniques to lock in the swing, transfer it to a goblet-hold catch and drop down into a squat—all in a smooth rhythm without knocking your teeth out.
How to do kettlebell taters
- Set yourself up like you would for a kettlebell swing with feet just outside the hips and the kettlebell slighty in front of you. Drop your butt and get into that pre-swing position.
- Hike the bell, drive through the glutes and hips, and come up into the top half of the swing. From here, you want to slightly pull the bell towards you and get your hands into a goblet-hold position.
- As the weight starts to fall, start the catch. As you catch, lower yourself into a squat position. Think of yourself like a set of brakes—your squat is the mechanism that slows the bell and prevents it from crashing to the floor.
- Stand up tall, flip your grip back to swinging position and restart the swing. It may take some practice to find the flow on this movement. Don’t overload your weight to start. Perfect your form before you pick up something heavier.
9. Kettlebell Hip Rotations to Split Squat
Muscles worked: hip flexors, quads, core, glutes, shoulders
Why it's great
Mobility baybayyy! I’d argue most athletes don’t do nearly enough of it. This movement is a mobility exercise disguised as a traditional strength movement, targeting your hips. The slower you go, the harder it is. Lock in and embrace the suck.
How to do hip rotations to split squat
- Grab an ab mat and a medium-heavy kettlebell. Reminder: Don't overload this movement, as it will compromise form.
- Set up in a half-kneeling position and rack the kettlebell up on the same shoulder as the knee that’s down on the mat.
- Take a breath, brace your core, and slowly rotate your front leg (the side without the kettlebell) out, around, and back until you’re in a fully kneeling position. Take your time and focus on really rotating that hip while you keep your balance.
- Retrace your steps slow and controlled back to the half-kneeling position. From here, stand up into a split squat then lower back down.
- Congrats, that’s one rep! Repeat for desired number of repetitions and then switch sides.
More kettlebell
Need to stock up on bells? Check out REP's lineup of award-winning kettlebells:
Ashley Boyer is the Editor in Chief of REP Fitness. She's an ACE-CPT and master's candidate in Sports Performance and Conditioning at Southern Utah University. When not training for obstacle course races, you can find her hanging with her dogs or binging history documentaries.
similar to this

Strengthmaxxing Is Everywhere. Here's How to Do It Right
Strength with a strategy.

Master Preacher Curls for Bigger Better Biceps
Curl confession.
NEWSLETTER SIGNUP
Product launch information, promotions, blogs, and REP news.